Listening to music or radio
Listening to BLUETOOTH device
Launch the app for music playback on your target device in advance.
If the System is already connected to a Bluetooth device, proceed to “2. Playing back using the System”.
-
1Connecting (pairing) the Bluetooth device
-
NFC
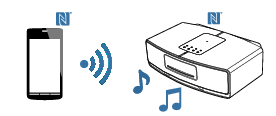
If your BLUETOOTH device supports NFC, you can establish BLUETOOTH connection simply by touching the System.
Checking whether your Android device (such as smartphone) supports NFC
Tap “Settings”, then “More” on the smartphone to check whether NFC setting is available.
CAUTION
The menu items displayed on the screen may differ depending on the BLUETOOTH device used.
If you are not sure whether NFC is available, connect manually. (Connecting a BLUETOOTH device manually)
NOTE
iOS devices (iPhone/iPad/iPod touch) do not support NFC. (As of July 2014)
Pairing multiple devices
You can register pairing information of up to eight Bluetooth devices on the System. When the ninth device is paired, the pairing information of the new device will overwrite that of the oldest device registered.
Connecting (pairing) NFC-enabled devices
Turn on the BLUETOOTH device (hereinafter referred to as target device), and enable NFC.Example on operating an Android device (such as smartphone)
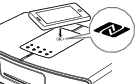
Tap “Settings” “More”.Set NFC setting “Reader/Writer, P2P” to on.Touch the N mark on the System with the NFC antenna area of the target device.
Simply bringing the devices near each other will not activate pairing. Touch the mark.
The System switches to the pairing standby state, and the “
 ” icon on the display blinks.
If a “Connect to Bluetooth?” message appears on the screen of the target device, tap “Yes”.
When the connection is established, “CONNECTED” appears on the display of the System.
Then the “ ” icon lights up.NOTE
After pairing is complete, move the target device away from the System. If the target device is left touching the System, the connection may be cut and become unstable.
If pairing is unsuccessful, delete the pairing information of the System on the target device and perform pairing again. If this still does not help, connect manually. (Connecting a BLUETOOTH device manually)
Connection starts automatically even if the System is in standby mode or set to other source.
Connecting a Bluetooth device manually
When connecting the System and the BLUETOOTH device (hereinafter referred to as target device) for the first time, perform pairing using the following method.
Set the source to “BLUETOOTH”.Press the button repeatedly to switch the source.
Press repeatedly until “BLUETOOTH” is displayed.Remote control
Main unit


(Press repeatedly)
The “
” icon on the display blinks, and the System enters into pairing standby mode.Turn on the target device, and set it to the state for pairing.Refer to the instruction manual of the device in use for further detail.
Android device (such as smartphone)
Tap “Settings”
“Wireless and network” in sequence.If “Bluetooth” is not checked, tap on “Bluetooth” to place a check mark to set to “On”.
Subsequently, tap “Bluetooth”
“Scan for devices” (or item with the same purpose) in sequence.iOS device (iPhone/iPad/iPod touch)
Please refer to any of the following procedures.
Tap “Settings”
“Bluetooth” in sequence.
Or
Tap “Settings” “General” “Bluetooth” in sequence.If “Bluetooth” is set to off in any of the above cases, set it to “On”.
Select “K575” (this System) on the target device.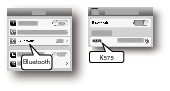
When the connection is established, “CONNECTED” appears on the display of the System.
Then the “ ” icon lights up.When the target device requests for password during pairing, enter “0000”.
NOTE
If pairing is unsuccessful, delete the pairing information of the System on the target device and perform pairing again.
-
2Playing back using the System
-
If pairing has not been canceled, you can connect to and play back from the BLUETOOTH device that was last connected to the System.
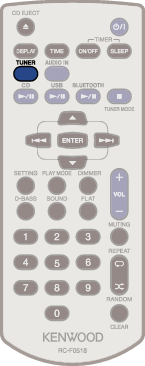
Operating from remote control
Operating from main unit


(Press repeatedly)
To pause
Press to pause during playback, and press to resume playback during pause mode.
Remote control
Main unit
To select a track
Press the [
 ] button to skip to the next track.
Remote control
Main unit


Press the [
 ] button to skip to the beginning of the track being played.
Press twice to skip to the previous track.To fast forward/reverse
To fast reverse, press and hold the [
] button.To fast forward, press and hold the [
] button.To resume normal playback, release the button.
CAUTION
Depending on the device used, the device may not function correctly.
During playback...
Remote control
Main unit
-
3To cancel the connection
-
To cancel using NFC
Touch the N mark on the System with the NFC antenna area of the target device that is currently connected.
“DISCONNECT” appears on the display of the System.
The “ ” icon lights up and then blinks (pairing standby state).NOTE
If you touch the N mark of the System using another target device, the device currently connected will be disconnected and the newly-touched device is connected.
To cancel manually
Press and hold the [
 ] button of the System until “DISCONNECT” appears on the display.
After “DISCONNECT” is displayed, the “
” icon changes from solid light to blinking light (pairing standby state).Remote control
Main unit


(Press and hold down)
(Press and hold down)
NOTE
The connection is canceled automatically in the following cases.
When the connection is canceled on the target device, or the Bluetooth function on the target device is turned off.
When the System or the target device is turned off.
When the source is changed to another audio sources.
Listening to CD
-
1Playing back
-
Insert the CD with the label side facing up into the center of the disc loading slot in front of the System.
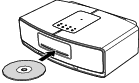
The CD will be inserted automatically when you insert it in partially.
“READING” is displayed when the CD is being read.
When it disappears, playback starts automatically.If the System has been set to another source, the System switches to CD playback automatically.
To eject a disc
Press the [
 ] button on the remote control or the main unit.
Remote control
Main unit


To play/pause
Press to pause during playback, and press to resume playback during pause mode.
Remote control
Main unit

To stop
Remote control
Main unit
For MP3/WMA/AAC files, resuming playback after stopping a file starts playback from the beginning of the track (resume function). Pressing the [
] button again when playback is stopped cancels the resume function.If other source is selected, the resume function is canceled.
To select a track
Selecting a track while skipping each track in sequence
Press the [
] button to skip to the next track.Remote control
Main unit
Press the [
] button to skip to the beginning of the track being played.
Press twice to skip to the previous track.To select a track with the track number
Remote control


(Select the number)
(Enter)
Examples:
To select track no. 3:

To select track no. 17:


To fast forward/reverse
To fast reverse, press and hold the [
] button.To fast forward, press and hold the [
] button.During playback...
Remote control
Main unit
Playing back by folder
Audio files only
Set the System to the playback by folder mode. Only the selected folder is played, and playback stops after all the files in the folder is played.
Switch the source to CD, and stop the playback.
Select (folder playback mode).
Remote control


Folder playback mode

Program playback mode

Normal playback mode
Select the folder to play back.Remote control

(Select a station)
When a folder is selected, the folder name is displayed and the tracks in the selected folder are played back automatically.
To cancel the folder playback mode
Stop the playback, and press the [PLAY MODE] button to select normal playback mode.
Listening to USB device (audio files)
-
1Connecting the USB device
-
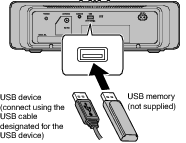
The “
 ” icon lights up after it is connected.
NOTE
If the USB device is connected to the System while it is turned on, the System will supply power to the USB device and also charge the USB device.
CAUTION
Stop playback before disconnecting the USB device. Disconnecting the USB device during playback may cause damage to the files and file system of the USB device.
You cannot send any data from the System to the USB device.
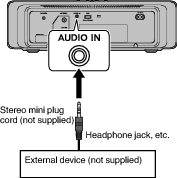
To play back audio players such as Sony’s Walkman that manage music data files with special software programs, connect to the AUDIO IN jack of the System. (Connecting an external device)
-
2Playing back
-
If the System is in the USB source, playback starts automatically only when a USB device is connected.
If a USB device is already connected, operate as follows.
“READING” is displayed when the USB device is being read. Wait until the display disappears.
Operating from remote control

Operating from main unit
(Press repeatedly)
To stop
Remote control
Main unit
For MP3/WMA/AAC files, resuming playback after stopping a file starts playback from the beginning of the track (resume function). Pressing the [
] button again when playback is stopped cancels the resume function.If other source is selected, the resume function is canceled.
To pause
Remote control
Main unit
To cancel pause and start playback, press the button again.
Selecting a track while skipping each track in sequence
Press the [
] button to skip to the next track.Remote control
Main unit
Press the [
] button to skip to the beginning of the track being played. Press twice to skip to the beginning of the previous track.To select a track with the track number
Remote control
(Select the number)
(Enter)
Examples:
To select track no. 3:
To select track no. 17:
To select track no. 123:

To fast forward/reverse
During playback...
To fast reverse, press and hold the [
] button.To fast forward, press and hold the [
] button.Remote control
Main unit
Press the [
 /
/  ] button on the remote control or main unit to fast-reverse or fast-forward the track to start playback from the middle of the track.
Selecting a track in the folder
Select a folder.Remote control
(Select a folder)
The first track in the folder is displayed.
Select a track.Remote control
Main unit
Press the [
] button to skip to the beginning of the track being played. Press twice to skip to the beginning of the previous track.Press the [
] button to skip to the next track.
Listening to FM radio
-
1Connecting antenna
-
If the antenna has been connected, proceed to step 2.
-
2Presetting stations automatically
-
There are two tuning methods available, namely auto tuning (AUTO TUNE) and manual tuning (MANUAL TUNE).
Selecting a tuning method
Switch the source to “TUNER”.Remote control
Main unit

(Press repeatedly)
Switch the tuning methodRemote control
Main unit
(Press repeatedly)
(Press repeatedly)
Alternates between “AUTO TUNE” and “MANUAL TUNE” each time you press the button.
Select a station.Press the [
] / [ ] button while “AUTO TUNE” or “MANUAL TUNE” is displayed.Remote control
Main unit
For AUTO TUNE:
Tunes to the next station automatically at each press of the [ / ] button.For MANUAL TUNE:
Press the [ / ] button repeatedly until the desired frequency is received.
The frequency changes continuously while the button is pressed.
The reception frequency changes in steps of 50 kHz.NOTE
No sound is heard during station tuning.
Presetting the stations
Store the station received to a specific preset number. If you select a preset number that has a station stored to it, the new setting will overwrite the old setting.
You can store up to 40 stations.
Tune to the station you want to store, then press [ENTER].Remote control
(To receive FM broadcast)
(Enter)
Select a preset number to store information.Remote control
(Select the number)
(Store)
You can also select by specifying the number using the number buttons.
Selecting by specifying the number using the number buttons
Remote control
(Select the number)
(Store)
Examples:
To select preset no. 3:

To select preset no. 17:
NOTE
If a preset number that has been registered with a station is selected, the old registered station is overwritten.
-
3Listening to a preset station (Tuning)
-
During FM radio reception
Remote control
Main unit
(Select a station)
(Select a station)
Selecting by specifying the number using the number buttons
Remote control
(Select the number)
Examples:
To select preset no. 3:
To select preset no. 17:
CAUTION
Depending on the signal condition, you may have reception problems even for the preset stations.
-
4Adjusting the antenna
-
If the reception is poor, adjust the supplied indoor antenna to get better reception while listening to the broadcasting.
CAUTION
The reception becomes poorer for residences constructed of reinforced concrete such as apartment buildings. If you are unable to get good reception, move the supplied indoor antenna near the window.
If the supplied indoor antenna is unable to provide good reception, we recommend installing a commercially available outdoor antenna.
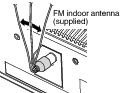
Adjusting the FM antenna
Adjust and secure the supplied indoor FM antenna.
Adjust the position of the FM antenna while listening to the FM broadcast.Locate the position for the best reception by changing the height and direction.
 Secure the tip of the antenna lightly using a thumbtack or tape.
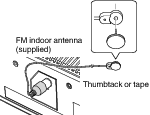
CAUTION
Be careful not to injure your fingers when using a thumbtack.
The supplied indoor FM antenna is tied together at the time of purchase, untie and straighten the antenna.
Listening to an external device
-
1Connecting an external device
-
Set the volume of the System to the minimum, and turn off the power.Connect an external device to the AUDIO IN jack.
 Turn on the System.
 -
2Playing back
-
Select “AUDIO IN”.
Remote control
Main unit

(Press repeatedly)
Start playback of the external device.Do not disconnect the digital audio player during playback. It may cause malfunction.
Adjust the volume.Remote control
Main unit


To adjust the audio input level
Adjust the audio input level when there is a contrast between the volume of the external device connected to the AUDIO IN jack and that of other sources.
Select “AUDIO IN”.Remote control
Main unit
(Select)
Enter into the setting mode.Remote control
 Select the “INPUT LEVEL” tab.
Remote control
(Select)
(Enter)
Select the level.Remote control
(Select)
(Enter)
To increase the volume of the external device, set to the
 side.
side.To decrease the volume of the external device, set to the
 side.
side.