Getting started
-
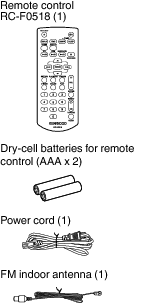
1Verifying the accessories
-
Check that you have all the following items, which are supplied for the System.
-
2Preparing the remote control
-
Inserting batteries
Match the polarities (
 and
and  ) of the batteries.
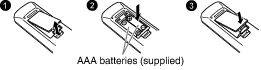
NOTE
The batteries supplied are intended for checking system operation. Replace them with new ones as soon as possible.
CAUTION
Danger of explosion if the battery is incorrectly replaced.
Replace only with the same or equivalent type.
Store the battery in a place where children cannot reach. If a child accidentally swallows the battery, consult a doctor immediately.
To prevent the battery from overheating, cracking, or starting a fire:
-
Do not recharge, short, disassemble or heat the battery, or dispose of it in a fire.
-
Do not leave the battery with other metallic materials.
-
Wrap the battery with tape and insulate when throwing away or storing it.
-
Do not poke the battery with tweezers or similar tools.
Dispose the battery in the proper manner, according to federal, state, and local regulations.
-
3Connecting the power cord
-
After connecting the supplied power cord to AC IN ~ on the System, plug the power cord into the AC outlet.
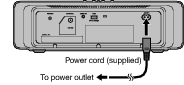
Insert securely all the way into the AC outlet.
Be sure to unplug the power cord from the outlet before going out or when the System is not in use for an extended period of time.
CAUTION
To avoid the risk of electric shock and fire
Do not use any power cords except the supplied power cord.
Do not use the supplied power cord with any other products other than this System.
-
4Adjusting the clock
-
Set the clock to use the timer setting, etc.
The System displays the clock in 24-hour time format.
Enter into the setting mode.Remote control
 Select “TIME ADJUST”.
Remote control


(Select)
(Enter)
Adjust the “day”, “hour” and “minute”.Repeat step 2 to set the “day”, “hour” and “minute” in sequence.
The System will automatically exit the setting mode once the setting is complete.
Checking the clock when the power is turned off
Press the [
 ] button to display for 5 seconds.
Remote control
Main unit


NOTE
The clock may gain or lose 1 to 2 minutes per month. You may need to readjust the clock periodically.
Set the clock again if the AC power cord is unplugged or the System is turned off due to the power failure.
Energy-saving mode
The System comes with an “Auto Power Save (APS)” function, which turns off the power automatically when no sound is output for 15 minutes. This function is enabled in the default setting.
Disabling/enabling Auto Power Save mode
This function turns off the System automatically if no operation is performed for 15 minutes.
The initial setting is “A.P.S. ON”.
|
Remote control |
||
|---|---|---|
|
|
|
Remote control |
||
|---|---|---|
|
|
|
|
|
(Select) |
(Enter) |
|
Remote control |
||
|---|---|---|
|
|
|
|
|
(Select) |
(Enter) |
 |
Enables Auto Power Save mode. |
 |
Disables Auto Power Save mode. |
NOTE
A.P.S. (Auto Power Save) Energy-saving mode
If no operation is performed for 15 minutes in the following situations, the System turns off automatically.
When the volume level is set to 0 or when the sound is muted
“USB” or “BLUETOOTH” is selected as the source, and no device is connected.
“USB” or “CD” is selected as the source, and playback is stopped.
Approximately 30 seconds before the power is turned off, “A.P.S.” starts to blink.
The 15-minute countdown restarts when you operate any buttons.
Before listening to FM radio
Before listening to FM radio on the System, connect the antenna first.
Unplug the power cord from the AC outlet before connecting the antenna.
Generally, installing the antenna near a window helps to improve reception.
Listen to the actual broadcast to determine the location for installing the antenna.
-
1Connecting antenna
-
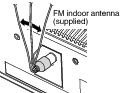
Connecting the FM indoor antenna (supplied)
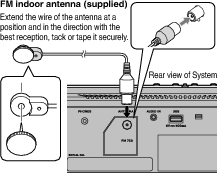
After you untied the bundled string, extend the FM aerial when connecting so that you can obtain the best reception.
-
2Adjusting the antenna
-
If the reception is poor, adjust the supplied indoor antenna to get better reception while listening to the broadcasting.
CAUTION
The reception becomes poorer for residences constructed of reinforced concrete such as apartment buildings. If you are unable to get good reception, move the supplied indoor antenna near the window.
If the supplied indoor antenna is unable to provide good reception, we recommend installing a commercially available outdoor antenna.
Adjusting the FM antenna
Adjust and secure the supplied indoor FM antenna.
Adjust the position of the FM antenna while listening to the FM broadcast.Locate the position for the best reception by changing the height and direction.
 Secure the tip of the antenna lightly using a thumbtack or tape.
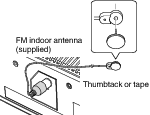
CAUTION
Be careful not to injure your fingers when using a thumbtack.
The supplied indoor FM antenna is tied together at the time of purchase, untie and straighten the antenna.
To listen to FM radio
|
Remote control |
Main unit |
|
|---|---|---|
 |
 |
|
|
(To receive FM broadcast) |
(Select) |
|
Remote control |
Main unit |
|
|---|---|---|
 |
 |
|
|
(Select a station) |
(Select a station) |