Installing the display unit and adjusting the height
- Remove the rear cover from the display unit (accessory ⑧).
- Slide the rear cover on the display unit (accessory ⑧) over and lift it up.
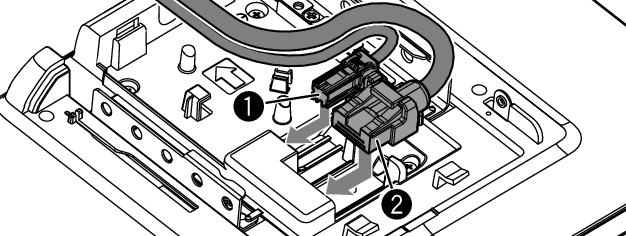
- Connect the Video cable for Display (1) and Power cable for Display (2).
- Run the display cables.
- Use the guides to secure the Video cable for Display (1) in place.
- Run the display cables along the interior guide path (between the posts). Install it so that the display unit has room to move. Tuck the remaining display cables inside the main unit.
- Install the display unit (accessory ⑧) to the main unit.
- Install the unit so that the hooks on the display unit (accessory ⑧) are inserted into the groove on the arm bracket.
- Adjust the display height according to the screw hole position.
- Fix the display unit with four hexagon head screws (accessory ⑨).
- Fix with hexagon head screws correctly. After installing the display unit (accessory ⑧) to the main unit, tilt the display forward until it stops and confirm that the display unit (accessory ⑧) does not hit vehicle parts. If the display unit hits vehicle parts, adjust the display height again.
- Adjust the length of the display cable to align with the height of the display unit.
- Install it so that the display unit has room to move. Tuck the remaining display cable inside the main unit.
- Attach the rear cover of the display unit.
- Insert the hooks on the rear cover into the grooves on the display unit. Slide it along the main unit until you hear a click.
- Fix the display unit cover with two binding head screws (accessory ⑩ ).
- Raise the display manually.